








A general Drakengard guide created after my advice began taking up a considerable portion of my (in-progress) review.
Everything is meant to be spoiler-free, but to avoid confusion (and help SEO), details like boss names are kept in collapsible text boxes. Use caution when opening these and verifying you’re reading the right content.
If you want me to cover anything specific, please leave a comment. This guide will be updated whenever I feel like it, until I die.
Ground Mission Tips
- Every (I think) standard ground mission has two treasure chests containing full-heal items. Their location depends on the specific mission, but they’re always in the same spot. It can be hard to find some of these considering the size of maps, but you can make educated guesses. Parts of the map you have no reason to go to often hold a chest. You can also ride your dragon to get a wider field of view when seeking chests out. If you’re about to die, it’s not a bad idea to stop everything and scout for chests. Mission time limits are usually extremely generous.
Attacking
Chain Bonuses
- Reaching specific attack chain numbers (seen in the bottom-right corner while attacking enemies) causes helpful items to appear. The order in which these appear is always the same, with a green sphere (restores HP) being the first to spawn. If a chain would spawn a green sphere while your HP is full, an orange sphere spawns instead, which inflicts decent damage across a wide area that knocks enemies down. At 100 hits, a special red/black sphere spawns, which temporarily increases your attack for around 45 seconds.
- Generally, I don’t think playing to maximize chains is worth the effort. Keeping chains high is easiest when attacking with a weak weapon, as you’ll land more hits before needing to find a new attack target to continue your chain, which always risks losing your chain. Naturally, any benefit from chain bonuses will be offset by the slower pace you’re defeating enemies, should you wield a low-power weapon.
- On the other hand, deliberately getting just the first chain bonus to heal your HP is a viable strategy that you should make use of when your HP starts to run low. Seek out nonthreatening enemy types, like basic soldiers, and wail on them until you get a chain of 15 hits. You can even swap to a weak weapon on your Weapon Wheel just for this purpose, then swap back to something stronger once finished.
Basic Moves
- Get used to carrying out your attack combos in a 360-degree motion. Enemies are easily stunned by attacks, and doing this inside mobs makes you more likely to interrupt any surrounding enemies winding up attacks. This also builds up your combo number, making it easier to get item rewards.
- You can attack once while mid-jump. I’ll be honest; I don’t really know what jump attacks are good for, if anything. You can’t combo with them, so they’re low DPS. You’re also extremely vulnerable at the start and end of your jump, so they’re awful to use within enemy mobs, which is most combat. There are no enemies that require you to use jump attacks to hit them.
- All weapons have consistent, set points in their attack combo where they briefly flash. Pressing the magic attack button (triangle by default) during the flash ends the normal combo chain and delivers a strong attack that knocks down enemies. The precise nature of this attack varies depending on the weapon. For instance, some weapons launch a shockwave forward. The shared behavior is that you knock down everything in a small radius around you.
- You can exploit the hell out of strong attacks. Many weapons have a strong attack opening in their first attack, so you can repeatedly knock enemies down, killing them before they can ever fight back. There’s a certain rhythm to this, but it’s pretty easy to get the hang of. Do not pay any attention to the weapon’s flash effect, as it comes very late during the correct input window. Instead, aim to press triangle just before or as the flash starts. I find it helpful to count the number of seconds it takes after starting my combo for a flash to show up, then I just time my button press to that count.
Lunge Attacks
- Lunge attacks can be executed by pressing the attack button after Caim has entered a full-speed run. Lunge attacks stop Caim in his tracks and cause him to send out a long-range, powerful shockwave that knocks enemies to the ground.
- Lunge attacks are incredibly useful, because there’s multiple ways to exploit them. A basic way to easily and safely defeat enemies is to move far away from your targets, build up speed, lunge attack, then rinse and repeat. The goal is to move far enough away to where enemies won’t pursue you, attack from a safe distance, then retreat the second they’re aggro. Unless you’re completely surrounded or running up against a mission’s time limit, this technique is virtually unstoppable. When in danger: lunge attack, lunge attack, lunge attack.
- This is the best way to deal with annoying enemies like ranged-attackers or heavily-armored knights. If you lunge at them the instant their AI even notices you, they won’t be able to do a thing.
- The shockwave has a gigantic hitbox, and you can time its release so that your weapon clips through a wall and releases its shockwave on the wall’s opposite side. If normal lunge attacks aren’t safe enough for you, this is a potential option to completely avoid engagement.
Defensive Maneuvers
- L1/R1 make Caim roll in that direction. This is supposed to be your main dodge technique, but I’d argue it’s not very useful. Caim often rolls in a straight line, putting so much distance between you and your target that they’ll often wind up another attack as you reapproach. It also provides very few invincibility frames. The roll can be a useful Hail Mary pass for escaping enemies that surround you, but that’s about it.
- L2 has Caim guard. I think this is much better than the roll. It nulls virtually any attack damage, which is what you’d want from the dodge roll, anyway. You can move extremely slowly while guarding, which can help for enemies that spam ranged attacks. But blocked hits still push you back, so groups of ranged attackers can prevent you from ever getting close.
Allies (Party Members)
- All Allies are found by completing optional Story missions. Return to the title screen and access Story mode to see a list of all available missions. Routinely check previously-completed Chapters for any missed Verses. Select a greyed-out Verse to see its unlock requirements. Finding alternate “paths” in Drakengard is a standard part of progression, and you’re not meant to find them in chronological order, so regularly look through your Chapters and Verses for new content.
- The game kind of lies to you. It states party members can be summoned when Caim is in danger. While technically true in that it’s possible, Caim does not need to be at any HP threshold to summon party members. Press the required button (circle by default) after assigning an Ally in a mission’s preparation menu to call an Ally at any time during a mission. An Ally can be called up to three times per mission.
- When called, Caim will be swapped out, and you’ll control your set Ally. This is indeed useful to bail Caim out of danger, but Allies are also quite powerful. They may seem very slow, but their real benefit is their unique magic attack functionality. By holding and releasing the magic attack button, party members can charge and unleash devastating special moves. Since they don’t gain MP the way Caim does, magic attacks can be spammed for as long as an Ally is on the field.
- Allies are on a timer, represented by their HP bar. It decreases over time, and empties further upon taking hits. When an Ally’s HP hits zero, Caim will be swapped back in with the same HP he had when he left the field, and zero MP regardless of how much he had when calling an Ally. Be mindful of this. If desired, an Ally can be immediately called out again so long as any of your three allowed summons per mission remain.
- Arioch is an especially useful Ally. Her magic attack practically nukes the battlefield and lays waste to hordes of enemies. This is the most expedient way of amassing kills in the game, and a certain timed secret weapon unlock condition is almost impossible to achieve without its use.
- Ally kills do not count towards leveling Caim’s weapons. I assume EXP from their kills is still given to Caim at the end of a map, but I need to verify this.
- Since I believe leveling up weapons naturally through the course of the game is inefficient, I’d say to make liberal use of Allies and disregard the “lost” kills.
Problematic Enemies
Ranged Attackers
Archers and mages just suck to fight. I’m sorry. I wish I had more convenient advice. If these enemy types’ AI has them start attacking, they’ll often continue attacking endlessly, trapping you in hit stun and knockdown before you can ever get close enough to attack them. Don’t become frustrated into blindly charging ahead and losing half your HP bar. Instead, retreat until the enemies de-aggro, then charge up a lunge attack to unleash before they can start their infinite salvo again. It’s commonly good practice to deal with entire platoons of ranged enemies by doing guerilla hit-and-run lunge attacks over and over. Yes, it’s tedious, but it’s much safer and more reliable.
That Stupid Timed Phantom Guy
Some maps have a special enemy appear in set locations. A shadowy figure will emerge from the ground as a minute-long timer over their head counts down. You have exactly that long to defeat this enemy before they flee. There’s another catch: when they have a blue aura, only physical attacks hurt them. With a red aura, only magic attacks are effective. They swap auras every few seconds. If you defeat this phantom enemy, they drop an orb that gives all weapons on your Weapon Wheel EXP equal to the highest combo number you reached during your bout.
I’m gonna be real with all of you: don’t bother. Unless you’re specifically equipped for this enemy, you’re unlikely to beat them, and the reward’s not even that good when compared to conventional weapon EXP grinding strategies. Without an ideal magic attack, reaching the DPS needed to win is extremely difficult, if not impossible. Any magic attack that can’t be used consecutively, i.e., MAs with all-or-nothing MP costs, are basically worthless here. Also, phantom’s attacks can easily knock you down, wasting time and potentially swapping them to an unideal aura. This enemy is not worth its required fight time and preparation.
If you want to take your chances, know that you can freely reset the fight by retreating and de-aggroing the phantom before its timer runs out. When you return and they spawn again, the timer will start over from full. If the timer runs out, you’ll need to restart the map for them to respawn. However, some maps have multiple of these enemies, so you may be able to pivot to fighting one of the others. By retreating, you can build up your magic meter and such.
For the record, these enemies are marked on your map. If you see a sole enemy marker out in the middle of nowhere, it’s probably one of these jerks. They don’t typically spawn by default, however. I’m not sure if the conditions to spawn them are consistent, or what they even are. It could be related to reaching a certain mission objective, kill count, or minutes passed on a stage. I just don’t know.
How to Use Your Dragon
Sorry if this bums anyone out, but Drakengard is very blatant with when it expect you to use your dragon during ground stages. Encouraging dialogue from your dragon is often a sign that enemies are prone to mass immolation. If not, or dialogue suggests Caim is the one currently fighting, it’s likely that the enemy forces have long-range enemy types that will knock you off your dragon with two successful hits. If a map has an excessive number of enemies or is particularly large, it’s also probably time to thin the ranks with your dragon.
Of course, there’s some ambiguous circumstances where you can work your dragon in. If there aren’t too many long-range enemies, it’s possible to quickly dive in and shoot a fireball at them before they can attack. Regardless, striking enemies with your fire builds up your magic meter, so try and get as many enemies as you can with each fireball.
The dragon’s magic attack has it breathe fire in a 360-degree radius, potentially killing dozens of enemies at once. It’s pretty rad, and you’re invincible from the moment it starts until it ends. It’s a legitimate strategy to dash into a sea of ranged enemies, then use your magic attack before they fire, the subsequent invincibility robbing them of their chance to knock you down.
I’m not sure how the magic attack’s damage is calculated or how far its range is. Both seem extremely inconsistent to me. Sometimes it feels like I’ll miss targets visually within the fire breath, while at other times I’ll kill an enemy on the very edge of the radar. Perhaps stage topography and elevation is factored into the attack radius? I’m not sure. Just expect the dragon’s magic attacks to sometimes not do what you expect them to.
Putting offense aside, the dragon is obviously great for quickly moving across maps. Press X for a boost of speed, but note that it’s pressure-sensitive. You need to lift your thumb completely before you can get another boost. Boosting and then holding the button allows for a slightly higher cruising speed, but it’s not as fast as tapping the X button in perfect rhythm.
Aerial Mission Tips
- Holding the fire button allows you to mark in-range enemies, and releasing the fire button sends out fireballs that automatically chase all marked enemies. This doesn’t guarantee the attack will land, but since enemies come in groups, most of your DPS should come from firing constant homing shots. Your maximum number of enemy markers increases as you progress through the story.
- Manual shots do more damage-per-shot than homing shots. The reliability of homing shots typically supersedes this disadvantage, but it’s worth keeping in mind for slower enemies in smaller numbers.
- Generally, the best attack pattern for aerial missions is to hold the fire button while drawing sideways figure 8s across the near-edges of the screen. This covers where most enemies will be positioned, and the diagonal motions allow you to get the most distance out of your reticle’s speed increasing when moving in a straight line. Also, by pressing X, you can easily dodge enemy fire. Get into a rhythm of pressing and releasing the fire button while doing these motions to make sure you’re not reaching your maximum number of lock-on targets.
- If you find yourself unable to hit a fast target, even with homing shots, first lock onto your target as much as possible. Then, when the fast enemy’s model is approaching yours, time the release of your homing shots so that the instant they come out, they only have to travel a minimal distance to their target. Basically, if something is flying past you to your left or right, you want your shots to start moving right as the enemy becomes parallel to you.
- Holding L2 allows you to control the dragon directly, with your perspective being wherever they’re facing. It’s much easier to manually aim and dodge doing this, and it’s extremely important for fast enemies.
- Always remember that you can press L1 and R1 together to completely turn around. The dragon takes wide turns, and it’s much faster to use this technique than to manually turn.
- When holding L2, if an enemy target just barely flies past you, you can press L1/R1 to roll in the direction they went, along with following your reticle, to do a quasi-sharp turn.
- In particularly difficult, late-game aerial missions and boss battles, you should begin habitually dodging alongside your general attack patterns. Literally, just spam L1/R1 at a consistent rhythm so you’re not an easy target. You’ll know you’re doing this correctly when the space between your index finger and thumb starts to hurt. Sorry. I didn’t make the game.
- If you hold L2 and fly directly downwards from a high enough altitude, you can catch a downdraft for an additional boost of speed. There’s an obvious visual and sound effect when this happens, but you might not have realized what it’s communicating. This technique is of debatable practicality, as most aerial missions don’t necessitate using the entire 3D space, but hey, it exists.
- Successful attacks fill your magic meter. At the cost of one full magic bar, you’ll fire a flurry of shots that chase all enemies in the vicinity. It appears to me that at least some of these shots are biased towards enemies that your camera is facing during the attack’s entire animation. Use this to manipulate which targets your magic attacks prioritize.
- When launching your magic attack, you have a brief moment of invulnerability. If you know a hard-to-avoid attack is coming, you can time the use of your magic attack to protect against it. Don’t underestimate the difference this can make. In boss battles, you should always use your magic attacks defensively until the boss’s HP is nearly depleted.
- If defense isn’t a concern (see above), save your magic attacks for obnoxious and/or dense enemy formations. For meeting time requirements in Free Expeditions to unlock hidden weapons, this is an extremely important consideration. Identify which enemies take the longest time to deal with, and conserve magic attacks for them.
- There’s debate over whether the dragon’s level 3 or Chaos form is better overall. The Chaos form is stronger, but the level 3 form has significantly more range, which is extremely helpful. The greater number of attack opportunities from having more range can result in higher DPS than the Chaos form’s higher damage. I didn’t learn of this difference before completing everything with the Chaos form, so it’s certainly doable, but consider swapping between the two if you’re struggling with a specific mission.
Weapon Tips
I’m judging weapons on two things: expediency and utility: how quickly does a weapon kill enemies? Does it have some special trait that’s useful outside of quickly killing enemies? It’s fine to enjoy using a suboptimal weapon. It’s not like Drakengard is an especially difficult game. But for those who want extra guidance, or at least would like to know how to assess weapon quality, this is for you.
Judging Basic Attack Combos
- A weapon’s attack stat isn’t everything. If a weapon has 50 power but swinging it takes the same amount of time as swinging a weapon with 25 power three times, then the latter actually does better DPS, deceptively making it the stronger weapon.
- Of course, the opposite can be true. This especially extends for slow weapons with wide swings. Maybe each swing is slow, but if you can hit five targets with each one, then you can still reach great DPS. While I generally recommend avoiding heavy weapons, there are a couple worth considering.
- I don’t recommend any weapons that knock enemies away from you. Pretty obvious reason: you can’t continue hitting the enemy with your combo because they’re pushed out of range, thus ensuring these weapons have bad DPS. Yes, they’re useful for keeping enemies off of you, but you can use strong or lunge attacks to force any enemy to the ground with any weapon. Also, the best way to make sure an enemy isn’t a threat is to just, y’know, kill them.
Judging Magic Attacks (MAs)
- Magic attacks should be a secondary consideration when judging a weapon. You’re mostly going to be using normal combos during maps, so it makes sense to prioritize that area. Still, magic attacks are important. A weapon with good basic attack DPS is leaving long-term DPS on the table if its magic attack isn’t worth a damn.
- Broadly, magic attacks are simply high, sudden damage over a wide range. They rack up kills quickly, deal heavy damage to even the tankiest enemies, dispatch annoying enemies, provide a long-range attack, can bail you out when enemies gang up on you, and so on. There are slight differences in behavior and hitboxes, but for the most part, a good 80% or so of magic attacks essentially just create an explosion in front of you. Very simple to utilize.
- That said, there’s a lot of room for nuance. Some magic attacks have respectable damage and range, but their MP cost is too high. If most enemies fall from any magic attack, then something that costs four MP bars but does more damage probably isn’t a good magic attack overall. If all of that extra damage isn’t needed for a kill, what’s the high MP cost even for? Consider things like that.
- A weapon’s magic attack can change its behavior between weapon levels. While uncommon, magic attacks can become worse with more levels. For one example, sometimes a long-range bullet-esque MA “upgrades” into a homing attack. While that might sound better on paper, you could close the ability to line up enemies and get a ton of kills at once, because the MA will now only attack enemies immediately near you. If you don’t like a weapon’s upgraded MA, you can equip the weapon’s lower level form, but I would advise just finding a new weapon to use. Nothing is worse the loss in normal attack DPS.
- MP costs vary between MAs, but the way MP functions can also vary. Some MAs are all-or-nothing costs, requiring you to more closely consider when to expend your magic. Others might not even require a full magic bar to use. When you have enough MP to use your MA, your magic meter(s) will be flashing.
- Some magic attacks have unusual effects and behaviors, including ones that provide utility beyond inflicting damage. In the right circumstances, they can be more useful than traditional MAs. Look below for notable examples.
Notable Magic Attacks
- Swordsmasher: Temporary invincibility, and everything that makes contact with Caim takes slight damage. The offensive benefit is basically just extra damage during your normal combos; it’s the invincibility that’s really special. Struggling to get past a dense hallway or ranged attackers? Well, here’s your solution. The Swordsmasher’s biggest flaw is that it’s an early-game weapon, so while its magic attack always has some value, it’s increasingly difficult to use the Swordsmasher as an all-purpose weapon. You might want to keep it on your Weapon Wheel, saving it for emergencies after charging its magic meter at the start of a map.
Generally Good Weapons
- Hymir’s Finger: This absolute behemoth boasts a massive attack stat, and while its swings are slow, they’re exceptionally wide and capable of sweeping up entire enemy mobs. It can struggle in tight spaces where enemies can interrupt your attacks, but otherwise, it’s excellent DPS. Also, its magic attack is pretty bad; the hitbox is extremely small, and the damage isn’t anything special when considering the power of its attack combos.
- Reaper’s Scythe: Has a decent swing speed, range, and attack value. Not as strong as something like Hymir’s Finger, but the start of its combo leaves you less vulnerable. The magic attack can be a little awkward. It’s powerful, but at full strength, it travels so far that it takes forever before the attack ends and you can use another one. It appears to home in on enemies while increasingly prioritizing whichever adjacent targets are the furthest away from you. The magic stuns any hit enemies.
Weapon Hunting Tips
Speaking from experience, a lot of information on how to acquire certain weapons is incorrect. I know of at least one weapon where every single guide on GameFAQs contained the same inaccurate conditions, but the Fandom Wiki’s page for the weapon is/was correct.
Unfortunately, I don’t currently have the time or patience to compile and verify my own weapon location guide. Equally unfortunate, I’m unaware of any convenient, chronologically ordered, list-format guide online that’s error-free. I tried finding one and failed. If anyone knows of one that I can point people to, please notify me.
While cumbersome, your best option might be to use a chronological guide (such as on GameFAQs), then individually look up each weapon’s name on a Wiki to use their explanation instead. Make sure you’re not looking at the page/explanation for Drakengard 2 or 3, as they reuse many weapon names from the first game.
Verses with Arabic numerals (1, 2, etc.) are NOT the same as Verses with Roman numerals (I, II). Roman numeral Verses are secret, alternate stages with completely separate (if any) mission objectives, weapons, and so on. Verse 2 is a different stage from Verse II, etc. Never treat them as the same stage, or you’ll find guides to be inaccurate.
“Can I find all 65 weapons without a guide?”
No.
And I say that with complete sincerity and near-complete accuracy. While not all secret weapon requirements are esoteric, some are so obtuse that the likelihood of encountering them on accident is virtually impossible.
For example, one weapon requires you to stand at completely arbitrary sections of the map in a specific order. There’s no indication of where to stand, what the correct order is, or if you’re starting or progressing any part of the process. This method of unlocking is completely unprecedented and late into the game; it is the only secret requirement of its type. Players are never taught to even attempt or look for something like this. A player randomly stopping at each of these coordinates in their exact, correct order has likely never happened to anyone who has ever played Drakengard, and likely never will.
I think players intending to see all endings should keep a weapon location guide handy the moment they start the game. This also saves you from spending valuable time playing a stage more than once. If you want to see how many weapons you can find on your own before consulting a guide, be my guest, but I tried playing that way and found it unsatisfying. And I personally hate playing games with guides, so this is saying a lot. But yeah, you will not find all weapons without some help. That’s just how it is.
- If you’re struggling with any Free Expedition weapon requirements, you can first progress through the Story mode as much as possible. The level-ups, easily-obtained hidden weapons, and new dragon forms will eventually bowl over most Free Expeditions. While Story mode locks your dragon form relative to what you’re supposed to chronologically have, Free Expeditions allow you to use anything you’ve ever unlocked on any mission. You can even bring the strongest dragon form to early-game Free Expeditions.
“I Still Can’t Beat [Blank] Mission!”
People tend to struggle with Free Expedition aerial missions the most when it comes to obtaining hidden weapons. If my general tips aren’t helping, and you have the strongest dragon forms unlocked, well… there’s not a whole lot I can say. You can try asking for help regarding a specific mission in the comments, but it’s possible my advice will be to level up or practice my suggested techniques. There is, in all seriousness, an art to drawing the optimal figure 8s.
The real reason I’m including this section is to say this: don’t quit the stage if your run is going poorly. Even if you’re certain you’ll go over the allotted time, take too much damage, etc.—finish the stage. Your dragon will earn EXP and the power of its attacks will gradually increase. No matter what, you will get closer to finishing these objectives, even from failed attempts. That EXP is lost if you quit; so don’t.
Weapon Level Grinding
Weapons gain EXP by killing enemies. 1 kill equals 1 EXP for the weapon equipped at the time of the kill. The number of kills needed changes from level to level, weapon to weapon. I haven’t noticed any consistent pattern. Check your current progress during a stage by pressing R3 and looking at the Status tab. The game does not display progress earned towards the level(s) following a weapon’s next level, but it does keep tracking kills. Kills are only “wasted” when a weapon has earned enough to reach level 4, the maximum level of all weapons.
While it may seem expedient to progress normally through the game’s content and switch weapons whenever one maxes its level, I don’t think this is the right strategy. The difference in a weapon’s power from one level to the next can be massive, and dropping down from a level 4 weapon to a level 1 weapon can turn maps into a grueling slog due to your decreased damage. Any time potentially saved by trying to multitask will rendered moot, if not exceeded by time lost. Even if not, you’ll probably be miserable.
Instead, whenever you find a weapon you’d like to use, stop everything and max its level (or at least get it to level 3). I recommend entering Story mode and playing Chapter 1, Verse 2. These are the weakest enemies in the game, yet the map has one of the highest enemy counts of any in the game. Ergo, tons of enemies to mow down before needing to start another map.
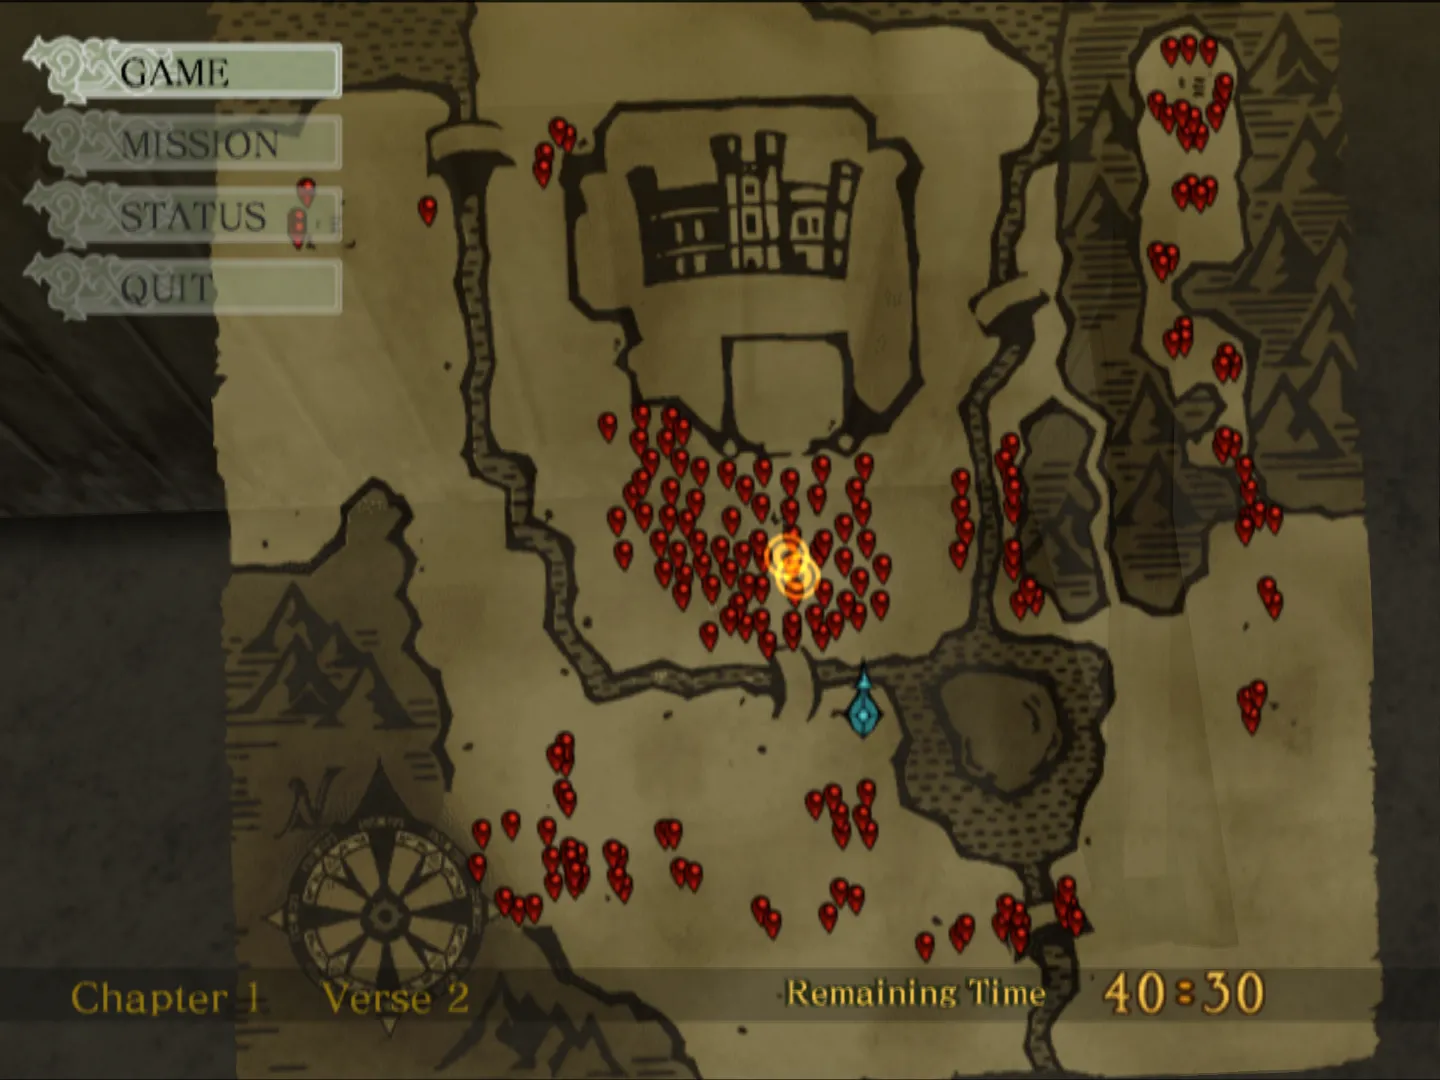
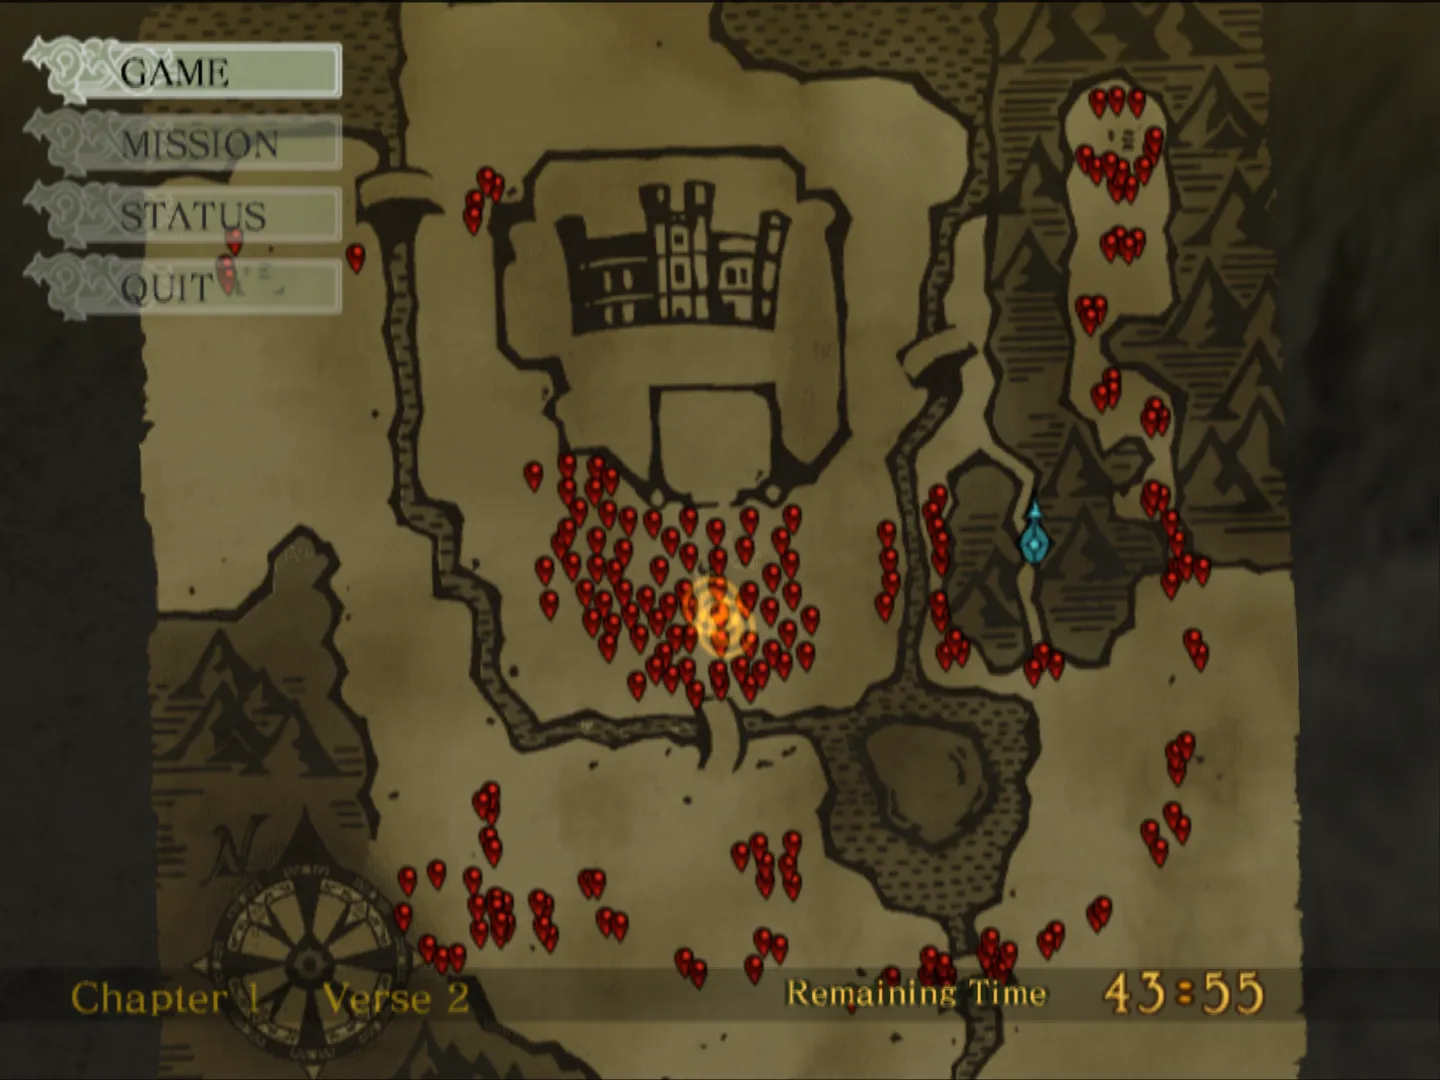
There are two treasure chests containing full-heal items to prolong your grind. One is behind a wooden garrison just before crossing the bridge north of your spawn point. It’s on the right side of these four garrisons, in its right corner. The second is located in the right-hand mountain region, in the narrow passage left of the long passage leading to a fort. This narrow passage contains nothing but heavy-armor enemies.
I’ve seen people recommend using the magic attack of the Windsinger, which temporarily puts a damage-inflicting aura around Caim, then switching to a weapon you want to level while the magic attack is active. Even though it’s the Windsinger’s magic earning the kills, those kills will go to the weapon you swapped to. The Windsinger’s magic is strong enough to kill enemies just by running into them, so you simply ram into as many things as you can until your magic runs out. Then you go back to the Windsinger, build up your MP, and repeat.
I don’t care much for this method, myself. I think having to build up the Windsinger’s magic takes too much time relative to how long the spell is active. If you’re playing on an emulator with a capable turbo function, I think you’re best off just having turning that on and mashing your weapons’ attacks like normal. The enemies in Chapter 1, Verse 2 are so easily outclassed that you barely have to pay attention to the game, and mistakes are meagerly punished. Just keep an eye on your HP, as even the smallest damage adds up after battling 1000+ enemies.
I like to bring eight weapons in need of levels, grind one to its next level, then swap to a new weapon until all enemies are dead or the mission’s one-hour time limit is close to running out. You could gamble (or look up, I suppose) on how many kills a weapon will need to level up a second or third time on the same map, but since you can’t see that number in-game, I don’t like to risk wasting kills.
Also, consider ignoring parts of the map with a high density of archer enemies. If they start chain hit-stunning you, the time taken to kill them probably isn’t worthwhile in favor of finishing and resetting the map. On that note, fulfill all mission objectives immediately. You won’t need to engage in more combat should something go wrong and you need to escape the map to recover HP.
Boss Tips
Black Dragon
The main thing you need to know about this fight is that the Black Dragon will attempt to automatically dodge any homing fireballs. It’s not impervious to them; it’s possible for homing fire to land if it’s fired close enough, or if the boss is stuck in an animation. Still, you should rely on manual shots.
Hold down L2 for this entire fight and track the boss based on sight, sound, and your radar. Scan up and down, as it can move vertically outside of your sight. Sometimes, the boss will zip straight to your backside. Press L1 and R1 simultaneously to instantly turn around, and hope this saves you enough time to land some shots.
The boss is most vulnerable while charging its strongest attack, which has a loud, obvious audio cue. You won’t have much time to aim, so you’ll need to practice, and sometimes, you just won’t make it. Remember the L1+R1 reverse during these moments, as the boss prefers to travel the furthest distances right before charging this attack.
The Black Dragon’s charged attack is difficult to dodge even when you know it’s coming and roll ahead of time. In fact, it’s probably best to press X and boost in one direction rather than to time a rolling dodge. Try and stay towards the top of the arena boundaries for this reason, as you’re less likely to have a dodge attempt be cut off by an invisible wall, and you can pick up a downdraft for additional speed. Use your magic attacks defensively, timing their release to when a charged attack will hit, granting you invincibility when it does.
Be patient with your attempts. The random flight patterns of the boss matter a lot as to how quickly it can be beaten. Sometimes, it’ll often fly in front of you during an attempt, allowing for several easy shots. Sometimes it won’t. Hope for good luck, and practice so you won’t necessarily need it.
Ending A Boss
Name (SPOILERS)
Manah
I’ve seen some people struggle with this one, which is understandable if you try and fight them fairly. Luckily, they’re easily exploited. This boss is stunned by your attacks, so you can head straight towards them and unload manual shots, dealing significant damage before you’re forced to reposition. As awkward as it looks, you should often be right up against their model, firing away. Use L2 to keep them in sight for as long as possible while the collision physics slowly push you apart.
Ending B Boss
Name (SPOILERS)
Furiae / The Goddess
In my opinion, this is the most difficult fight in Drakengard. This boss has very quick attacks with subtle changes in their automatic-tracking trajectory due to the variable distance between you and the boss. I personally struggled heavily with its horizontal slashes.
My best advice is to get one or two manual shots in at the start of the fight via L2 aiming, then immediately fly upwards as much as you possibly can. If you stay in the starting area, it’s likely that any attempts to dodge the horizontal attacks by charging south with the X button will have the stage boundaries cut you off, causing you to take damage. By flying higher early on, you give yourself a “buffer” to avoid hitting the invisible walls. For whatever reason, it seemed far less likely to be blocked by the upper invisible walls, even after flying all the way up there. It’s possible the upper boundaries are more conical-shaped than the bottom, but I digress.
This boss doesn’t attack in a consistent rhythm, in my experience. I’ve had times where it just flew left and right for several seconds doing nothing. As such, you should prepare to intercept its path with manual shots. Your cursor can outpace their movement if you start moving it while holding L2 as soon as the boss changes direction. While positioning yourself for manual aiming, hold down the fire button to get in some chip damage with lock-on shots, as your cursor will likely overlap the boss as you move it ahead of them.
It’s most vulnerable when it stays still to do its vertical slashes, which you can reliably dodge with the L1/R1 roll technique. Get in a bunch of manual shots during these sequences.
The boss intermittently starts a special attack where it becomes invincible and spawns several flying swords around it, which can be targeted and shot down. After making these swords, it will stay still for a bit before flying away to the left or right. Immediately chase it using L2. After it stops, you have very little time before it sends all remaining swords at you. The damage is cumulative, so this attack can mean instant death.
To get rid of these, use your homing shots. It only takes one bullet to dispel a sword. Ideally, you’d just draw two half-circles around the boss, tracing the swords’ positions. However, the cursor speeds up as it moves, which makes maintaining the shape difficult. Instead, I’d recommend drawing four quarter-circles, lifting up on the square button several times to reset the cursor’s speed and maintain control over your aiming. When all swords are down, you’ll have a very brief window to land another shot or two.
As for your magic attacks, always keep at least one bar charged for the sword attack. Sometimes, you’ll get really unlucky positioning during this sequence. The boss can fly directly in front of you and make it impossible to target their perimeter, for example. For these cases, use the magic attack you have stored up to get rid of the swords. If you neglect this, you risk instant death to bad luck at any time.
The boss’s unpredictable flight patterns can work against it, too. Occasionally, the boss will fly strangely close to you or waste time doing nothing, and both opportunities are great to capitalize on and land manual shots. I’ve had runs where it just sat in front of my face at the start as I melted half its health bar. You need to expect any of these attack patterns at a moment’s notice, even when it’s acting docile.
Ending E Boss
Name (SPOILERS)
The Mother Grotesquery
As the entire nature of this boss is a spoiler, I’ll contain all discussion in a dropdown text box.
Strategy (SPOILERS)
This boss emits white and black rings, which need to be destroyed by sending out your own, matching rings. The square button sends white rings, while triangle sends black rings. Colliding rings of the same color are destroyed. Incorrect color pairs destroy all of your existing rings and temporarily prevent you from sending out more. If a ring touches you, it’s an instant game over. If you survive for 2:45 minutes, you win. The boss’s ring pattern and speed is the same every single attempt.
While this is ostensibly a rhythm game, it’s not really, because there’s no metronome. In a normal rhythm game, even without memorizing the note sequences, you can intuit their timing based on the song’s construction or time signature. Hence the “rhythm” aspect. As this sequence is entirely notes, your only way of replicating it is by memorizing the pattern, or reacting in real-time based on the appearance/sound effect of the rings after they’ve already been sent out. This is more meaningful than it might sound.
Welcome to Hell. Okay, seriously, there is a strategy that anyone can utilize to defeat this boss, particularly its insane final 45 seconds. It’s called pause buffering, and it’s what it sounds like. By rigorously pausing and unpausing, you can take all the time you need to memorize the upcoming note patterns. Pause, take note of the required inputs, unpause and instantly input what you need, then pause again. Complete until finished.
While this is a substantially easier method than rote memorization, it’s not completely trivial. The notes come so fast that you still need to focus and input the notes quickly between pauses. When unpausing, there’s a few frames before the game accepts inputs again, so make absolutely sure you’re not missing your first input. Even with this strategy, you can’t survive any mistakes.
If you can’t swallow your pride and pause buffer, you’re in for a rough time. I don’t think most people are physically capable of finishing the climax of this fight just from sight and reaction. There’s simply not enough time to process the note patterns then input them in real-time. Just consider memorization an absolute necessity.
How do you memorize the sequence when it takes a minute and a half of gameplay just to see it? Great question. You can either look up the note sequence online, or use this handy dandy tool stumpbeard made to practice this very section. Partially pause buffering is also an option: memorize twenty notes or whatever, input all of those, pause and “recall” the next set, and so on.
Good luck. Without pause buffering, it’s all down to pure motor skills, memorization, and focus.
Post-Ending E Bonus Aerial Mission
Name (SPOILERS)
Tokyo Aerial Mission / Air Force Fighter Jets
How to Unlock / Play (SPOILERS)
View Ending E, then go to the Free Expedition map. Move your cursor around the unoccupied top-left of the map. With Ending E achieved, you can find an invisible stage marker for Tokyo containing this one mission. Like with any other mission, you can replay this one as much as you want, even after completing it.
The enemies here are extremely fast. If things go well for them, you’ll be ineffectively firing at random while your HP is slowly picked off by their potshots. Try and go for one enemy at a time; doesn’t matter which, just whichever one you get a bead on first. Use L2 aiming to trace their position while holding down the fire button to lock on. Occasionally roll using L1/R2 in the direction they’re heading to shake off any offscreen pursuit while keeping your target in sight. They enemies make wide turns, so the speed loss from rolling can be made up for by moving your reticule ahead of your target in L2 perspective. Remember to keep up via constantly speed boosting by pressing X.
What you should be trying to do is locking on as many times as you can while following the enemy. They’ll often be too far away, but you any lock-ons at all are fine. Hold your fire until your target inevitably turns toward your path. The goal is to unleash your shots right before your target is adjacent to you. If done properly, the shots will emerge right as the target passes by you, and they’ll have a minimal distance to travel to hit your target. Their fast speed won’t help them there, and any of them should fall in 2-3 salvos.
If you have a lot of time on your hands, I found a weird exploit. In my experience, flying towards the very top of the map and angling your reticule upwards so that you’re automatically flying in a very small circle makes it impossible for the enemies to hit you. While it’s also nigh impossible to aim with this awkward movement, you can blindly fire manual shots and hope that the enemies will eventually, by sheer coincidence, fly over your firing path and get hit. I spent a few minutes doing this and took down three of the five targets without being hit. The rest were never shot down. The enemies might be on fixed flight patterns, and some paths may never intercept your fire while using this method. Still, just taking out any enemies removes some of the pressure on you.
Reward (SPOILERS)
After beating this mission, in Free Expedition aerial missions, go to select your dragon form. Highlight the Chaos form and press down on the D-pad. You will highlight an invisible “???” option. Select it and start the mission, and Caim will be riding atop one of the fighter jets you fought. This is the best “dragon” form in the game, boasting exceptional speed, strength, and durability. It’s only good for messing around in missions you’ve already beaten, but hey, it’s something.
Leave a Reply